
Most walking boot complications our podiatrists treat come from one thing patients aren’t told at discharge — how the boot alters gait mechanics on the opposite side. The hip and knee pain that develops weeks later has a specific cause and a simple solution most prescribing doctors never mention. Call (810) 206-1402 — expert podiatric care across Michigan.
Walking Boot (CAM Boot) Guide: Everything Your Podiatrist Didn’t Have Time to Tell You
Medically reviewed by Dr. Tom Biernacki, DPM
Board-certified podiatric surgeon | Balance Foot & Ankle
Last reviewed: May 2026
A CAM boot (Controlled Ankle Motion boot / walking boot) is one of the most commonly prescribed orthopedic devices — and also one of the most misused. Patients leave the office with a boot and basic instructions, then spend the next 6 weeks making mistakes that slow their healing. This guide covers everything your podiatrist meant to explain in detail.
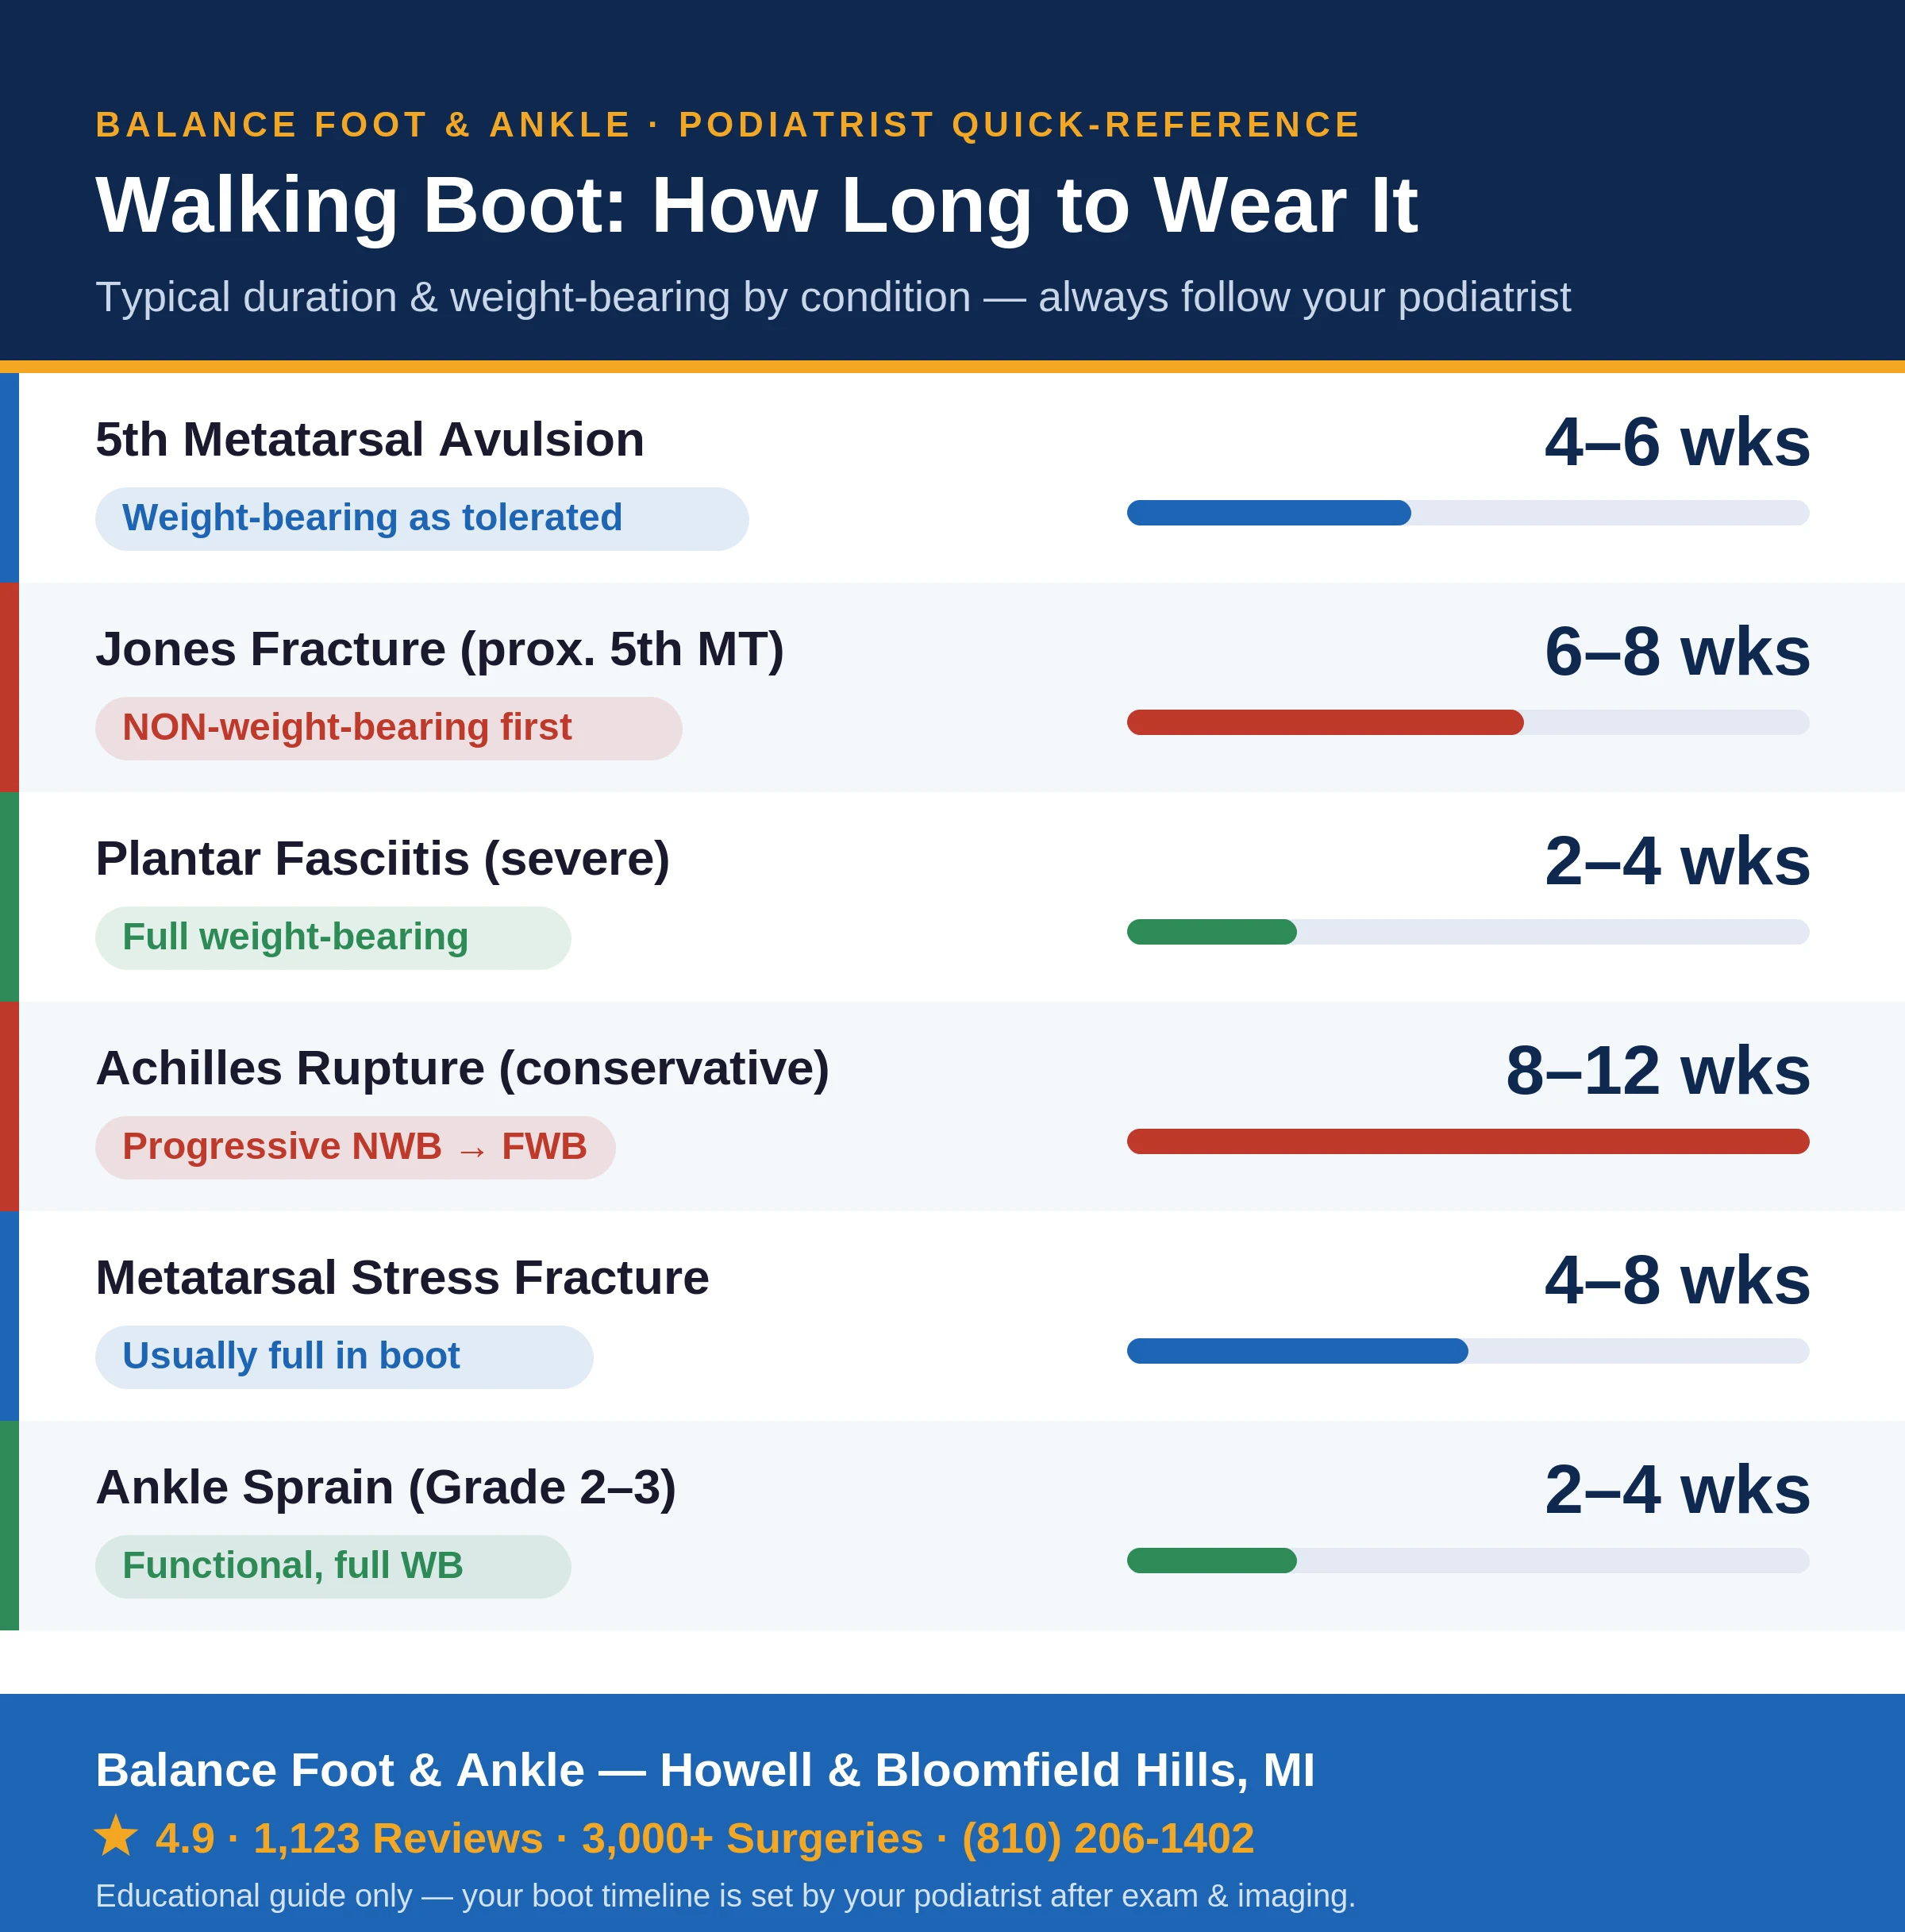
For a complete guide on when you actually need a boot for plantar fasciitis, see our plantar fasciitis walking boot guide.Walking Boot Protocol by Condition: How Long and How Much Weight
| Condition | Boot Duration | Weight-Bearing Status | Boot Comes Off For | Key Warning Sign |
|---|---|---|---|---|
| 5th Metatarsal Avulsion Fracture | 4–6 weeks | Weight-bearing as tolerated from day 1 in most cases | Sleeping and showering (unless told otherwise) | Pain increasing after week 1 → possible Jones fracture — call office |
| Jones Fracture (Proximal 5th MT) | 6–8 weeks NON-weight-bearing; then 4–6 weeks partial | NON-weight-bearing for first 6 weeks; crutches required; absolutely no weight in boot until cleared | Sleeping only; must wear for ALL transfers | Any weight-bearing before clearance risks non-union — call immediately if you accidentally stepped on it |
| Plantar Fasciitis (Severe) | 2–4 weeks typically | Full weight-bearing — boot provides offloading and immobilization | Sleeping and showering; never walk barefoot even at home | If pain not improving by week 2 → may need orthotic or injection; contact office |
| Achilles Tendon Rupture (Conservative) | 8–12 weeks; transition through heel lifts | Progressive — NWB first 2 weeks → PWB weeks 3–6 → FWB with heel lift weeks 7–12 | NEVER comes off during the entire progressive protocol without podiatrist approval; night splint substituted for sleeping | Sudden pain or popping → re-rupture emergency — go to ED immediately |
| Stress Fracture (Metatarsal) | 4–8 weeks depending on severity | Usually full weight-bearing in boot; some high-risk fractures (MT neck) may require NWB | Sleeping and showering | Increasing pain with activity in boot = fracture may be displacing → call same day |
| Ankle Sprain (Grade 2–3) | 2–4 weeks functional boot; then brace transition | Weight-bearing as tolerated from day 1–3 | Sleeping; shower with waterproof cover; transition to lace-up brace after boot | Inability to weight-bear after day 3 → may have missed fracture; call office |
| Post-Surgical (General) | Varies by procedure; typically 4–12 weeks | Per surgical protocol — do NOT exceed weight-bearing level prescribed | Sleeping and showering only; do NOT remove early without surgical team approval | Increasing pain, redness, warmth, fever → wound/infection concerns; call same day |
The 7 Most Common Walking Boot Mistakes (And How to Fix Them)
| Mistake | Why It’s a Problem | Fix |
|---|---|---|
| Wearing the boot too loose | A loose boot allows the foot to slide and rotate inside — this prevents immobilization, the entire purpose of the boot; actually causes friction blisters and increases injury movement | Tighten all straps from the toes up — toes, midfoot, ankle — until the foot is snug but not cutting off circulation. You should be able to slide two fingers under the top strap. |
| Not wearing a sock | Skin contact with boot material causes blisters, abrasions, and skin breakdown — especially over bony prominences and the shin | Always wear a thick crew sock (at least mid-calf) or use a boot sock liner. Compression sock is excellent if swelling is also present. |
| Walking on an uneven surface without a shoe lift on the other foot | The boot adds 1–2 inches of height to the booted foot, creating a leg length discrepancy with every step — this causes hip, knee, and low back pain over weeks of boot use | Wear an “even-up” shoe leveler on the opposite shoe ($20–30 OTC); or wear a thick-soled shoe on the unbooted foot. Your spine will thank you. |
| Sleeping in the boot every night | Unless specifically instructed by your surgeon (Achilles rupture, some ankle surgeries), sleeping in the boot all night is unnecessarily uncomfortable and can cause ankle stiffness from static positioning | Most fracture and sprain patients can remove the boot at night if they are non-weight-bearing getting to bed. Ask your podiatrist specifically. For Achilles: night splint replaces the boot for sleep. |
| Driving while wearing a right-foot boot | Illegal and dangerous — a boot on the right foot prevents safe brake pedal operation; significantly increases accident risk; your liability if crash occurs | Do NOT drive with a right-foot boot. Left-foot boot: driving may be possible in automatic transmission vehicles — discuss with your doctor and check your state’s laws. |
| Removing the boot “to let the skin breathe” during the day | Every unprotected step creates the same injury forces the boot is preventing; one bad step can displace a fracture or re-injure a healing tendon | If skin irritation is the issue: adjust sock thickness, use a gel liner, check boot fit. Do NOT remove during activity. Skin issues are fixable; a displaced fracture is not. |
| Skipping PT exercises prescribed with the boot | Most boot prescriptions include specific exercises (ankle pumps, range-of-motion, gentle strengthening) intended to maintain circulation and prevent muscle atrophy during immobilization | Do the exercises as prescribed — they’re designed to be safe with the injury. Ankle pumps (flexing/pointing the foot 20× per hour) prevent DVT, reduce swelling, and maintain calf muscle tone. |
Contact Your Podiatrist Immediately If You Experience Any of These
| Symptom | What It May Mean | Action |
|---|---|---|
| Increasing pain after the first 3–5 days in the boot | Fracture displacement, missed fracture, or inadequate immobilization | Call office same day; may need repeat X-ray |
| Calf pain, redness, or warmth (not at the fracture site) | Deep vein thrombosis (DVT) — blood clot; immobilization is a risk factor | Call office immediately or go to urgent care; DVT is treatable but dangerous if ignored |
| Fever over 101°F with foot pain | Possible infection (especially post-surgical) | Call office immediately; go to ED if after hours |
| Numbness or tingling in toes (new or worsening) | Boot too tight (compartment syndrome early warning) or nerve compression | Loosen boot immediately; call office; if not relieved in 15 min go to ED |
| Open wound or skin breakdown under the boot | Pressure ulcer — especially dangerous in diabetic patients | Call office within 24 hours; diabetic patients call same day |
You just got a walking boot and your back already hurts from the height mismatch. Here’s the $30 fix orthopedic surgeons recommend.
You’re in the right place. Dr. Tom Biernacki, DPM, FACFAS — board-certified foot & ankle surgeon with 3,000+ surgeries — explains exactly what walking boot tips means and what works. Call (810) 206-1402 for same-day appointment at Howell or Bloomfield Hills.
Most patients in a walking boot skip one specific accommodation their prescribing physician didn’t mention — and it’s the most common reason for secondary knee, hip, and back pain that develops during boot wear. Our podiatrists explain what it is and why the ER almost never addresses it. Call (810) 206-1402 — expert podiatric care across Michigan.
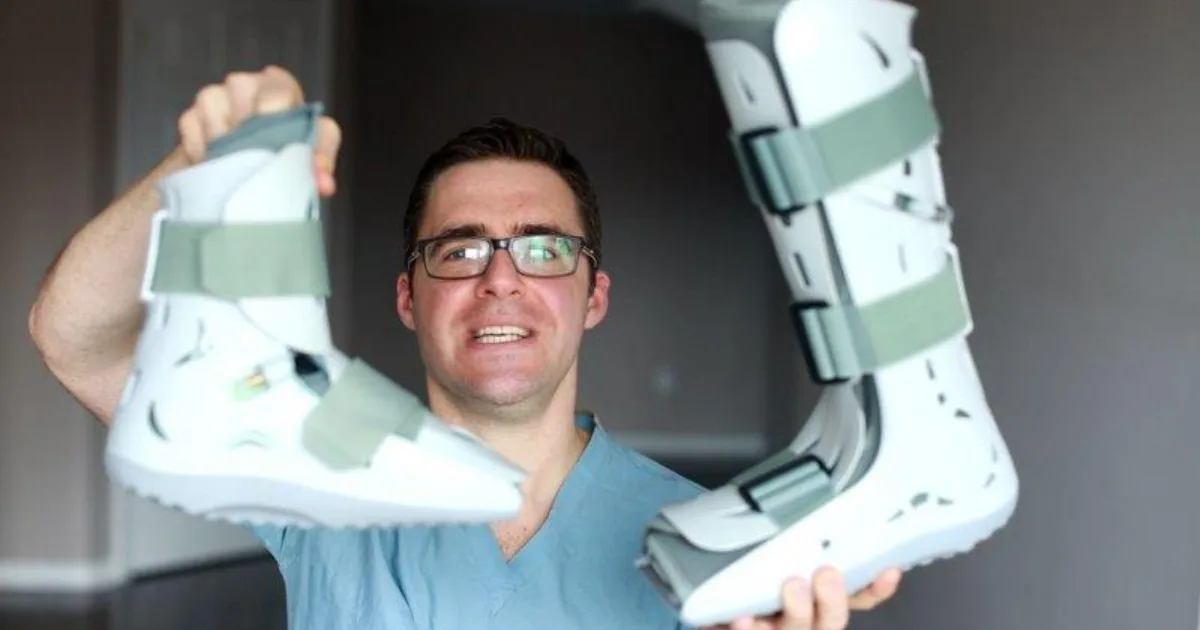
If you’ve just been placed in a walking boot (CAM boot / pneumatic walker), your first few hours in it probably raised a dozen questions: How tight should it be? Do I wear a sock? Can I drive? What about sleeping? Having put thousands of patients in boots, here are the practical answers to everything you’ll encounter over the next few weeks.
What Is a Walking Boot and Why Do You Need One?
A CAM (controlled ankle motion) walking boot immobilizes the ankle and midfoot while still allowing protected weight-bearing. It’s prescribed for stress fractures, ankle fractures, fifth metatarsal fractures, Achilles tendon injuries, ankle sprains, post-surgical protection, and severe plantar fasciitis flares. The rigid shell limits the bending forces on healing structures while the rocker-bottom sole reduces pressure at push-off.
17 Essential Tips for Wearing a Walking Boot
These are the tips we give every patient at Balance Foot & Ankle when we prescribe a walking boot — the ones that prevent the most common complications we see at follow-up visits.
- Wear a sock inside the boot. A thick cotton or moisture-wicking sock protects the skin from the boot’s interior and reduces friction blisters. Never wear the boot directly against bare skin.
- Equalize leg length. The thick rocker sole raises your booted foot 1–2 inches above the other. This limb-length discrepancy — if ignored — causes hip and low back pain within a week. Wear a thick-soled shoe on the opposite foot or get a prescription shoe lift. This is the single most commonly neglected tip.
- Inflate pneumatic inserts correctly. If your boot has air bladders, inflate them to the point of firm, even compression — not tight enough to cause tingling or numb toes. Check each morning and before activities.
- Keep the boot on while walking. The only time the boot should be off is when you’re sitting still, sleeping (if your doctor permits), and showering (with a waterproof cast cover or bag).
- Take the boot off to sleep — if approved. Most patients are permitted to sleep without the boot (lower fracture risk in bed). Confirm with your podiatrist, as some diagnoses (Achilles repairs, unstable fractures) require the boot 24/7.
- Never drive while wearing a boot on the right foot. A right-sided boot legally and physically impairs your ability to brake. Even a left-foot boot may not be safe with automatic transmission if your reaction time is affected. Check with your doctor before driving.
- Shower safely. Use a waterproof leg cover (DryPro or similar) or a sealed plastic bag with a rubber band. Do not walk on wet surfaces with a wet or removed boot — falls on one foot are a significant injury risk.
- Watch for skin breakdown. Inspect the skin of your foot and ankle daily when the boot is off. Any red area that persists for more than 30 minutes after removal is a pressure point requiring padding or boot adjustment.
- Do ankle pumps throughout the day. While sitting with the boot off or even in the boot (gentle movement), ankle pumps (up and down, 10–20 reps hourly) prevent deep vein thrombosis (DVT) and reduce swelling.
- Elevate whenever possible. Swelling is your enemy — it slows healing and causes pain. Prop the booted foot above heart level whenever you’re sitting or lying down, especially in the first 2 weeks.
- Use crutches when indicated. If your doctor prescribed non-weight-bearing in the boot, use your crutches — the boot does not substitute for offloading. Partial weight-bearing means the boot handles the immobilization; crutches handle the load.
- Check for tingling or numbness. If the boot straps cause tingling, numbness, or skin color changes in the toes, the boot is too tight. Loosen one strap at a time and reassess.
- Keep the Velcro clean. Velcro clogged with sock lint loses its grip. Clean the hook side with a stiff brush weekly to maintain secure fastening.
- Don’t over-walk. Being in a boot doesn’t mean you can walk indefinitely. Follow your activity restrictions — most fracture protocols limit continuous walking to 20–30 minutes at a time in the early weeks.
- Exercise the hip and knee. With the ankle immobilized, the hip abductors, quadriceps, and gluteal muscles can weaken noticeably in 3–4 weeks. Seated leg lifts and quad sets maintain proximal strength while you recover.
- Know when to worry about swelling. Mild swelling inside the boot is normal. Sudden severe calf swelling, warmth, and pain — especially asymmetric — may indicate a DVT and requires emergency evaluation.
- Follow your weaning protocol. When your doctor clears you to transition out of the boot, wean gradually — 2 hours in normal shoes, rest in boot, 4 hours, rest, etc. — over 1–2 weeks. Abruptly stopping boot use causes a pain flare from muscle and tendon re-adaptation.
Key takeaway: The #1 neglected tip is leg-length equalization. Without a lift on the opposite foot, you’ll develop hip and back pain within days — this is preventable and patients kick themselves for not doing it sooner.
Essential Walking Boot Accessories: What to Buy (Amazon)

- ENGINEERED MESH
- Lining Textile
The Foundation Wellness products I recommend above cover pain relief, compression, and arch support inside the boot. Here are the additional accessories that make the biggest practical difference for the 4–8 weeks you’ll be in a CAM walker:
🛒 Walking Boot Accessories — Dr. Tom’s Practical Kit
Affiliate disclosure: As an Amazon Associate, Balance Foot & Ankle earns from qualifying purchases. These are items I specifically recommend to patients leaving our clinic in a walking boot.
Evenup Shoe Balancer — My absolute top accessory recommendation. The boot raises your injured foot 1–2 inches higher than your other foot, creating a leg-length discrepancy that produces back pain, hip pain, and abnormal gait within days. The Evenup attaches to your opposite shoe to restore equal height. Every single patient I put in a walking boot gets told to buy one of these.
Waterproof Boot Cover for Showering — Showering with a walking boot is miserable without this. A waterproof cast/boot cover keeps the boot and your dressing completely dry. Most patients remove their boot to shower — which is fine clinically — but if your boot has a splint insert or you’re non-weightbearing, a waterproof cover is safer and more convenient.
Boot Sock Liners — A thin, moisture-wicking sock liner inside the boot dramatically reduces skin breakdown, odor, and friction. The liner inside most walking boots is not washable — a removable sock liner solves this. Get 2–3 so you can rotate them daily. This is one of the most underrated comfort upgrades for a long walking boot course.
Foam Padding / Moleskin for Hot Spots — Every walking boot creates 1–2 pressure hot spots unique to your foot shape. A sheet of moleskin or self-adhesive foam padding applied to those spots on day 1 prevents blisters. Identify your hot spots in the first hour and pad them before skin breakdown starts.
Knee Scooter (Non-Weightbearing Alternative) — If your injury requires non-weightbearing or partial weightbearing, a knee scooter is dramatically more functional and less exhausting than crutches for indoor use. Most patients who try one wish they’d gotten it from day 1. Worth considering for any walking boot course longer than 3 weeks.
Common Problems in Walking Boots and How to Fix Them
Even with perfect technique, some issues arise predictably. Here’s how to handle the most common ones without a clinic visit.
- Blisters: Usually from bare skin contact or sock bunching. Fix: thick smooth sock + moleskin pad over the blister site.
- Hip / back pain: Almost always leg-length discrepancy. Fix: thick-soled shoe or ½-inch heel lift on the opposite foot — relief is usually immediate.
- Swelling despite elevation: May need to loosen the air bladder pressure. Try sequential compression (intermittent pneumatic device) if available.
- Odor: Moisture buildup in a closed boot. Fix: foot powder + daily sock changes + allow the boot interior to air dry each night.
⚠️ Call your podiatrist if:
- Sudden calf swelling or pain (DVT risk — emergency evaluation)
- Skin breakdown or open wound developing under the boot
- Significant numbness or tingling in the foot that doesn’t resolve with strap loosening
- Pain increasing (not decreasing) after the first week in the boot
MOST COMMON MISTAKE WE SEE
The most painful and preventable mistake with a walking boot is failing to use a heel lift or even-up shoe on the opposite foot. A standard walking boot adds 1.5–2 inches of height to that leg, creating a leg length discrepancy with every step. This asymmetry transfers abnormal load to the contralateral knee, hip, and lower back — and within 2–3 weeks causes significant pain in joints that were perfectly healthy before the boot was prescribed. An equal-height heel lift or a dedicated even-up device on the other shoe costs less than $30 and prevents this completely.
WHAT ELSE TO CONSIDER — RELATED CONDITIONS & COMPLICATIONS
- Boot fit that is too loose — the foot slides inside the boot, creating shear forces on the injury site and extending healing time; tighten straps from the bottom up
- Contralateral knee/hip pain — a new pain in the opposite knee or hip while wearing the boot means leg length discrepancy — add a heel lift to the other shoe
- Skin breakdown or pressure sores — red areas at bony prominences inside the boot; add a sock layer or thin foam padding; never ignore skin changes, especially in diabetics
- Calf atrophy — expected with immobilization; range-of-motion ankle pumps while in the boot reduce muscle loss; the boot does not need to be removed for these exercises
- DVT risk — calf tenderness, swelling, or warmth not explained by the original injury; leg immobilization increases DVT risk; seek evaluation if new unilateral calf swelling develops
RED FLAGS — SEE A PODIATRIST URGENTLY
- Increasing (not decreasing) pain at the original injury site after 1 week in the boot
- New calf swelling or warmth on the booted leg (DVT)
- Skin redness, blistering, or open areas inside the boot (especially in diabetics)
- New hip, knee, or back pain on the opposite side after starting boot use
- Numbness or tingling in the foot while wearing the boot (boot too tight)
Call (810) 206-1402 or book online.
Transitioning Out of a Walking Boot
As you wean off a walking boot, a supportive, cushioned shoe with a stable orthotic protects the recovering foot. See our podiatrist-recommended shoes, and follow your podiatrist’s transition plan.
The Bottom Line
A walking boot is a prescription device — following these 17 tips will make your time in it as comfortable as possible and protect the healing structure from the most common re-injury patterns we see. If you have questions about your specific boot protocol or are experiencing problems with fit, our team at Balance Foot & Ankle in Howell and Bloomfield Hills is just a call away.
Sources
- Trevino S, Baumhauer J. Tendon injuries of the foot and ankle. Clin Sports Med. 1992.
- Shereff MJ et al. Hindfoot kinematics during walking. Foot Ankle. 1990.
- Baumhauer JF et al. Ankle ligament injury risk factors. Am J Sports Med. 1995.
- AAOS. “Fractures (Broken Bones).” OrthoInfo.
Dr. Tom’s Picks: Walking Boot Comfort Products
Apply to the calf and Achilles area — muscles that overwork compensating for boot height. Arnica + menthol reduces the secondary soreness patients don’t expect.
View on Amazon →
Wear on the non-booted foot — swelling from gait compensation is common. Graduated compression keeps both legs managed during boot wear.
View on Amazon →
As an Amazon Associate I earn from qualifying purchases. As a Foundation Wellness partner I may also earn commission. Recommendations based on clinical experience.
Questions About Your Walking Boot Recovery?
Dr. Tom Biernacki, DPM, FACFAS • Howell & Bloomfield Hills, MI • 4.9★ 1,100+ reviews
Howell: 4330 E Grand River Ave · Bloomfield Hills: 43494 Woodward Ave #208